How to Choose a Slab Flattening Router Bit?

Choosing the right Slab Flattening Router Bit can determine whether a rough wood slab becomes a smooth tabletop or a costly mistake. The decision involves more than selecting the largest cutter available. Woodworkers must consider slab size, wood hardness, router power, shank diameter, cutting depth, and machine stability. A bit that looks impressive may overload a compact router within minutes.

In practical shop work, carbide cutters are often preferred for their durability and clean performance. However, carbide quality varies, and sharp edges still matter. A wide bit can remove material quickly, but it may leave deeper ridges when the router carriage flexes. Smaller bits take longer, yet they can produce more controlled passes around knots, bark inclusions, and uneven grain. Measure the router collet carefully. A poorly seated shank is dangerous and unreliable.

Keep dust collection close to the cutter. Fine dust can hide a developing problem. Check the bit for chipped edges, unusual vibration, or dark burn marks after each session. These details often reveal poor feed speed or excessive depth. Test the setup on scrap wood first. It feels slower, but it protects expensive slabs.

There is no universal best option. The ideal Slab Flattening Router Bit depends on the complete setup, not marketing claims. I have found that conservative passes usually deliver better results than aggressive cutting. Still, even careful advice has limits. Every router, sled, and slab behaves differently, so the final choice deserves a practical test before full production.

How to Choose a Slab Flattening Router Bit?

What a Slab Flattening Router Bit Does

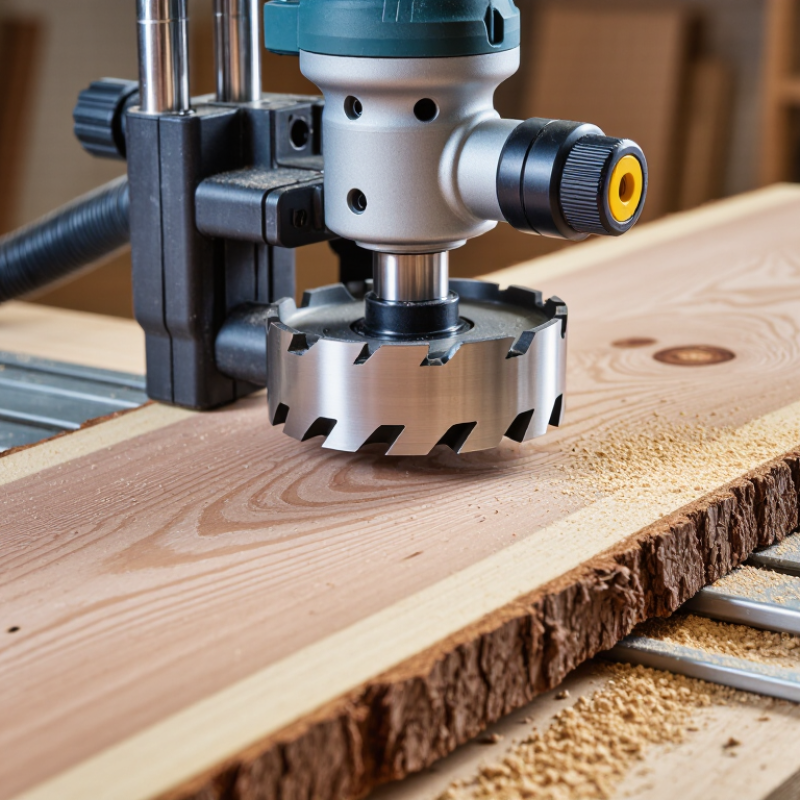
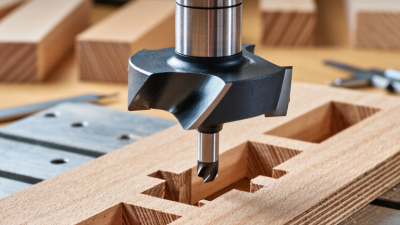
A slab flattening router bit bridges uneven high spots while a router sled guides the cutter across the board. Its flat cutting edges create a consistent reference plane, removing twist, cup, and saw marks in controlled passes. The bit does not make unstable wood stable. It only reveals a flatter surface.

The USDA Forest Products Laboratory’s Wood Handbook, FPL-GTR-282, reports that indoor wood commonly reaches about 6–8% moisture content. A slab far outside that range may continue moving after flattening. That matters when choosing cutting depth. I usually start with passes below 1/16 inch, then inspect the surface under angled light. Small passes feel slow, but they reduce tear-out and motor strain. Very aggressive cuts can leave ridges.

Bit diameter affects both coverage and control. A wider cutter covers more surface per pass, while a smaller cutter follows a compact sled more easily. Carbide cutting edges are practical for slabs because embedded grit or mineral pockets can damage ordinary edges. Still, carbide is not indestructible. The Wood Handbook also explains that wood movement varies with grain direction and moisture changes, so a perfectly flat cut may not remain perfectly flat. I once treated flattening as a final correction. That was optimistic. The bit should match the sled opening, router power, slab hardness, and the amount of material requiring removal. Efficient work is usually careful work.

How to Choose a Slab Flattening Router Bit? What a Slab Flattening Router Bit Does

A slab flattening router bit removes high spots and creates a level surface by making overlapping passes across the workpiece. Larger bits cover more area per pass, while smaller bits are easier to control in compact flattening sleds.

Planning example: estimated passes needed to cover a 36-inch-wide slab using 50% overlap between adjacent passes. The estimate is calculated as slab width ÷ (bit diameter × 0.5), rounded up. Actual results vary with sled width, edge clearance, material hardness, and cutting depth.

How to Match the Bit Size to Your Slab and Router

Matching a slab flattening bit to your router is more important than choosing the widest cutter.

Measure the slab’s width, thickness, and hardest areas before selecting a diameter. A bit around 1 to 1.5 inches suits many medium slabs and leaves manageable cutting resistance.

Larger bits cover more surface, but they demand stronger routers and steadier movement. Smaller bits work better for narrow slabs, detailed leveling, or limited router power.

Check your router’s approved collet size and maximum bit diameter. A larger shank usually offers better stability, but compatibility must come first.

The router should handle the bit’s cutting load without slowing dramatically. Set the bit to remove only a thin layer on each pass, often about 1/16 inch or less.

Deep cuts can overload the motor and produce ridges. Keep at least one-third of the bit overlapping the previous path, so the surface develops fewer visible lines.

Use a sled that extends beyond both slab edges. This gives the router a stable travel path.

I once chose a bit that seemed efficient, but my smaller router struggled near knots. The result was uneven and slower than expected.

That mistake changed my method: match the bit to the router’s real performance, not its advertised maximum.

Test the setup on scrap wood, listen for bogging, and recheck the bit height after several passes. Small adjustments matter.

Which Cutter Materials and Designs Suit Your Project

How to Choose a Slab Flattening Router Bit?

Which Cutter Materials and Designs Suit Your Project

Cutter material affects edge life, heat control, and surface quality. For hardwood slabs, carbide cutters are usually the practical choice. They resist abrasion from dense fibers, bark, and occasional mineral traces. High-speed steel can cut cleanly, but it dulls faster during wide flattening passes.

Solid carbide offers excellent rigidity and keeps its edge through repeated work. Carbide-tipped cutters cost less and can perform well on occasional projects. However, their brazed tips may suffer if the bit hits a hidden nail or stone. I once trusted a seemingly clean slab and damaged an edge within seconds. That mistake changed how carefully I inspect reclaimed wood.

The cutter design matters as much as the material. A wide, flat-bottom bit covers more area and reduces finishing passes. Replaceable inserts can be useful for larger slabs because worn edges are easier to change. Shear-cut designs often leave a cleaner surface and reduce visible tear-out near changing grain. Straight cutters remain simple and affordable, but they may produce more fuzz on figured wood.

Choose the diameter according to your router sled and machine power. A large cutter removes material quickly, yet it demands a rigid setup and careful feed control. Smaller cutters suit narrow slabs and lighter routers. Keep the cutting depth modest. Deep passes create heat, vibration, and unnecessary strain on the bit. My preference is a sharp carbide cutter with a balanced body, though the best choice may change with wood species, slab width, and available power.

How to Choose a Slab Flattening Router Bit? – Which Cutter Materials and Designs Suit Your Project

Cutter Material or Design Typical Cutting Edge Best-Suited Projects Durability Cutting Performance Surface Finish Recommended Cutting Depth Main Advantages Limitations and Usage Notes
Solid Carbide, Straight or Spiral Bit Two or more carbide cutting edges; spiral versions may use upcut, downcut, or compression geometry. Small to medium slabs, trimming, edge cleanup, and occasional flattening on a rigid router sled. ★★★★☆ Good hardness and wear resistance for ordinary hardwoods and softwoods. Good; a spiral edge generally leaves a cleaner cut than a basic straight edge. Light passes, commonly about 0.5–1.5 mm per pass depending on router power, wood species, and setup rigidity. Sharp, widely available, and suitable for detailed work and smaller machines. Can chip if it strikes hidden metal, stone, or a hard inclusion. Avoid aggressive passes and inspect reclaimed wood carefully.
Carbide-Tipped Spoilboard Cutter Replaceable or brazed carbide tips with a broad, flat-bottom cutting profile. General slab flattening, router sled work, and removing moderate unevenness from wide boards. ★★★★☆ Stable material removal with good resistance to abrasive wood fibers. Good to very good when the cutter is sharp and the sled is properly aligned. Typically light-to-moderate passes; reduce depth when the slab has severe twist or the router has limited power. Balanced choice for routine flattening; the flat bottom helps create a level reference surface. Usually slower than a dedicated insert cutter on very wide slabs. Brazed tips may require replacement of the entire bit if damaged.
Replaceable Carbide Insert Surfacing Cutter Multiple indexed carbide inserts, often with a flat or slightly shear-cut profile. Large slabs, repeated flattening work, production use, and projects requiring controlled tool maintenance. ★★★★★ High wear resistance and consistent performance when inserts are sharp and correctly seated. Very good; shear-style inserts can reduce visible tear-out compared with flat scraping profiles. Use shallow, controlled passes; the appropriate depth depends on cutter diameter, machine power, and slab stability. Damaged or dull inserts can be rotated or replaced individually; multiple edges distribute the workload. Higher initial cost and greater cutter mass. Check insert screws, balance, and manufacturer-specified speed limits before use.
Solid Carbide Spiral Surfacing Cutter Continuous helical cutting edges designed to shear fibers progressively. Premium visible surfaces, figured wood, cross-grain areas, and slabs where tear-out control matters. ★★★★☆ Efficient shearing action with smoother chip evacuation than many straight-edge profiles. Very good to excellent, especially when feed direction and cutting depth are controlled. Light passes are preferred; overly deep cuts can overload the router and damage the cutting edge. Reduced impact loading, smoother cutting action, and better results on difficult grain patterns. More expensive to sharpen or replace. Upcut designs may lift loose fibers, while downcut designs can pack chips into the cut.
High-Speed Steel (HSS) Cutter Hardened steel cutting edge, usually in a straight or simple profile. Light-duty work, softwoods, test cuts, or situations where frequent sharpening is acceptable. ★★☆☆☆ Acceptable in softer wood but loses its edge faster in hardwoods and abrasive materials. Fair to good when freshly sharpened. Very light passes and moderate feed rates are advisable to limit heat and rapid dulling. Can be sharpened relatively easily and may be economical for occasional light work. Generally less suitable for large hardwood slabs. Heat, knots, glue, dirt, and hidden grit can quickly reduce edge life.
Straight Flute, Flat-Bottom Design Parallel cutting edges with a level bottom surface. Basic leveling, flattening reference faces, and machines where predictable cutting behavior is more important than maximum finish quality. ★★★☆☆ Reliable material removal, but it can produce more impact and tear-out in reversing grain. Good after sanding; visible ridges may remain if the sled alignment or feed overlap is inconsistent. Light to moderate passes with steady feed and adequate overlap between tool paths. Simple geometry, easy to inspect, and effective for creating a flat reference surface. Less efficient chip shearing than spiral or shear designs. Do not use a bit with damaged or uneven cutting edges.
Shear-Angle or Spoilboard-Style Design Angled cutting edge that slices fibers rather than striking them directly. Hardwood slabs, figured grain, finished faces, and applications where reduced tear-out is important. ★★★★☆ Efficient and relatively smooth cutting with lower impact than a blunt flat profile. Very good, although final sanding is normally still required. Use shallow passes and maintain a consistent feed to preserve the cutting edge and avoid chatter. Improves surface quality and can reduce splintering on challenging grain. Requires correct installation and rotation direction. The angled profile may be less forgiving if the router sled is not rigid.
Upcut Spiral Design Helical flutes lift chips upward from the cut. Efficient chip evacuation, deeper pockets, and work where clearing chips is a priority. ★★★★☆ Good chip removal and reduced recutting of chips. Good, but loose fibers on the top surface may be lifted and torn in some woods. Use conservative depth and feed settings; secure the slab firmly because the lifting action can increase workpiece movement. Helps keep the cut area clear and can reduce heat caused by trapped chips. May worsen top-surface tear-out. It is not the first choice when the visible face has fragile or reversing grain.
Downcut Spiral Design Helical flutes press chips and fibers downward into the cut. Visible top surfaces, fragile edges, and projects where top-side splintering must be minimized. ★★★★☆ Controlled cutting with good top-surface fiber support. Very good on the top face when the tool remains sharp and chips are cleared properly. Use shallow passes and ensure adequate dust extraction to prevent chip packing. Helps hold down surface fibers and can reduce top-edge tear-out. Less effective at evacuating chips from deep cuts; excessive feed resistance or heat can occur if chips become trapped.
Large-Diameter Surfacing Cutter Broad cutting diameter, commonly combined with carbide tips or inserts. Wide slabs where fewer passes and efficient coverage are desired. ★★★★☆ High coverage per pass, but it requires a powerful, rigid router and stable sled. Good to very good when the cutter is balanced and the machine does not vibrate. Keep passes shallow and follow the cutter’s rated operating limits; larger diameter does not automatically permit deeper cuts. Reduces the number of overlapping tool paths and can improve workflow on broad surfaces. Produces greater cutting torque and may exceed the capacity of compact routers. Confirm collet size, clearance, balance, and maximum RPM.

How to Choose the Right Cutting Depth and Shank Size

How to Choose a Slab Flattening Router Bit?

Choosing the correct cutting depth and shank size determines both safety and surface quality. Measure the slab’s highest point before selecting a bit. The cutter should remove only the uneven surface, not unnecessary material. A practical first pass is often 1/16 to 1/8 inch deep. Harder wood may require an even lighter cut. Deep passes can create vibration, burning, and rough tear-out. I have sometimes tried to save time with deeper cuts, but the cleanup took longer.

The bit’s usable cutting height must exceed the material removed during each pass. However, extra length does not mean you should cut deeper. Keep the bit extension short whenever possible. This reduces flex and improves control. A 1/2-inch shank generally offers better rigidity for wide cutters and heavy flattening work. A 1/4-inch shank may suit smaller routers and light passes, provided the cutter and router are compatible. Check the router collet carefully. The shank must fit fully and hold securely.

Make several shallow passes instead of one aggressive pass. Mark the surface with pencil lines, then watch how evenly they disappear. If the lines remain in isolated areas, the slab may need another pass or better support. Do not trust appearance alone. Check the sled, router base, and collet before every session. A small setup error can leave repeating ridges across the entire slab. Even experienced woodworkers miss this step sometimes. That mistake is worth remembering.

What Safety and Compatibility Checks to Make Before Buying

How to Choose a Slab Flattening Router Bit?

Before buying, confirm that the bit matches your router’s collet and shank size. A loose fit is dangerous. The bit should seat fully, without forcing or excessive exposure. Check the router’s maximum collet capacity and the cutter’s rated speed. Large-diameter bits often require lower RPM settings. Never exceed the speed printed in the technical instructions.

Inspect the bit’s cutting diameter and depth range against your slab and router lift. A wide cutter needs a stable machine and a rigid work surface. Secure the slab firmly with clamps or a vacuum fixture. Movement can cause kickback, uneven cuts, or damaged edges. Use eye protection, hearing protection, and suitable dust control. Wood dust can travel farther than expected. Keep hands away from the cutting path, even when the router appears switched off.

Look for sharp, undamaged cutters and a clean body. Resin buildup can affect balance. I once underestimated how quickly dust clogged a small extraction hose. That mistake made the cut rougher and the motor hotter. I should have checked airflow earlier. Read the router and bit instructions together, not separately. Confirm that the base, sled, and bit opening leave enough clearance. Test the setup on scrap wood first. A quiet test pass is useful. Stop immediately if the bit vibrates, stalls, or produces burning smells.