Best Countersink Bit for Perfect Results?
When it comes to perfecting woodworking projects, the choice of a countersink bit is crucial. According to John Smith, a renowned woodworking expert, "A quality countersink bit can dramatically change the way your finished product looks." Selecting the best countersink bit ensures clean, accurate holes, which are essential for smooth finishes.
Countersink bits come in various sizes and styles. They also differ in material and functionality. A bit that works well for one project may not yield the same results for another. For example, some bits create wider holes for larger screws, while others finely tune for precision. This variability can sometimes lead to frustrating results if the wrong bit is chosen.
Additionally, the importance of proper technique cannot be overlooked. Even the best countersink bit can produce unsatisfactory holes if not used correctly. Many users find themselves grappling with misalignment or chipping. Reflecting on these issues can lead to more informed choices in future projects, ultimately improving outcomes in woodworking endeavors.

What is a Countersink Bit and Its Importance in Woodworking?
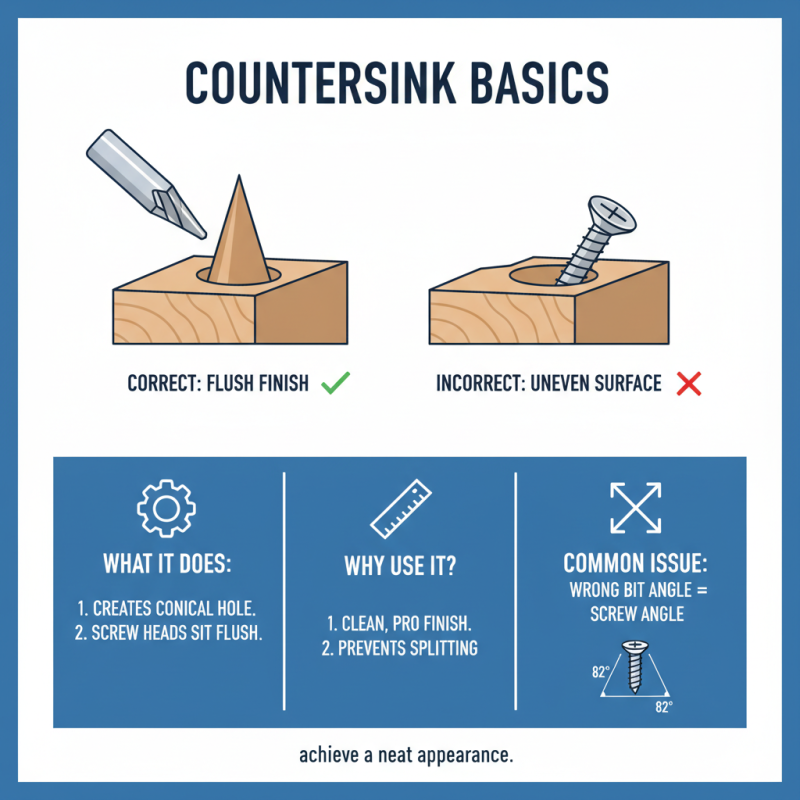
A countersink bit is a tool that creates a conical hole. This allows screw heads to sit flush with the surface of the material. It’s essential for achieving a clean and professional finish in woodworking projects. When done correctly, the countersink provides a neat appearance. However, if it's done poorly, it can lead to uneven surfaces. This often happens when the angle of the bit does not match the screw.
Using the right bit is crucial. The wrong choice can damage the wood or result in slippage. Small adjustments in angle or depth matter greatly. A smooth finish reflects craftsmanship. If a countersink bit is dull, it can tear the wood fibers. This results in an unappealing look.
A successful countersink process is not just about the tool. Wood selection is equally important. Different types of wood respond differently to countersinking. Some woods are harder and can splinter easily. Others might compress and not hold the screw tightly. This highlights the importance of practice and skill in woodworking. Each project offers a learning opportunity. Reflecting on previous mistakes is essential for improvement.
Types of Countersink Bits: Choosing the Right One for Your Project
When selecting a countersink bit, understanding the types available is crucial. There are several designs, each suited for different materials and applications. A basic countersink bit has a conical shape.
It's ideal for softwoods but may struggle with harder materials. On the other hand, a spiral countersink can handle tough wood and metals effectively. It cuts better but can be challenging for beginners.
Another important type is the combination bit, which features both countersink and drill functions. This bit can save time but requires precision. Inadequate technique can lead to uneven countersinks. A pilot hole is essential for best results. Many users skip this step, ending up with misaligned holes. The right countersink can enhance aesthetics, but choosing the wrong one might mar the project.
Choosing the right countersink bit demands careful consideration. Think about your project's specific needs. Whether you’re working with softwood or metal can make all the difference. Experimenting with different types is beneficial. Each has its own learning curve.
Measure twice and drill once, as the saying goes. Mistakes can lead to frustration and wasted materials. Better planning can yield the desired outcome.
Key Features to Look for in a Quality Countersink Bit
When choosing a countersink bit, certain features stand out. A sharp cutting edge is essential. It ensures clean holes with minimal burring. Material quality also matters. High-speed steel is common but can dull quickly. Cobalt bits offer more durability. Consider the size options available as well. A single bit for multiple sizes may not perform well.
Another key feature is the shank design. A tapered or flat shank offers versatility. This allows compatibility with various drills. Smooth operation can greatly impact your results. Check the flute design, too. Spiral flutes can help clear debris. If not designed well, they may cause binding during use.
Some bits can be too aggressive. They may create larger holes than intended. Testing on scrap wood can prevent mistakes. Not all bits will give you the perfect countersink. Choosing the right bit is crucial. It can significantly affect the final appearance of your projects.
Best Countersink Bit for Perfect Results
| Feature |
Description |
| Material |
High-speed steel (HSS) or carbide for durability and longevity. |
| Bit Size |
Variety of sizes available to match screw head sizes. |
| Flute Design |
Deep flutes for efficient chip removal. |
| Point Angle |
Standard 90° or adjustable angles for diverse applications. |
| Compatibility |
Suitable for use with electric drills and drill presses. |
| Finish |
Coated for reduced friction and enhanced cutting performance. |
| Brand Options |
Available in various ranges for all budgets. |
How to Use a Countersink Bit for Optimal Results
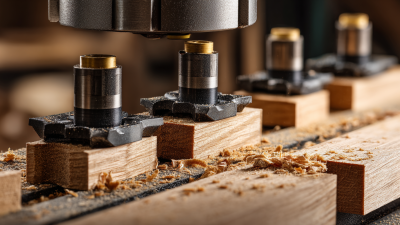
Using a countersink bit correctly can make a significant difference in your woodworking projects. To achieve optimal results, start by selecting the right size for your screws. Measure the diameter of the screw head and choose a countersink bit that matches closely. A tight fit ensures that the head sits flush with the surface.
Drilling technique plays a crucial role as well. First, mark your spot clearly to avoid mistakes. Steady your hand while drilling. If you rush, you might end up with uneven holes. Take your time and apply light pressure. Don’t force the bit; let it do the work. Often, you might notice that too much force leads to splintering or an imprecise countersink.
After countersinking, check if the screw sits correctly. Sometimes adjustments are necessary. It’s worth taking a moment to evaluate your results. If the screw doesn’t sit flush, you may need to adjust depth or re-evaluate your technique. Consistent reflection on your process can lead to better outcomes. Mistakes provide valuable lessons in woodwork.
Maintenance Tips for Longevity of Your Countersink Bit
Maintaining your countersink bit is key to achieving perfect results in your projects. Regular cleaning is essential. After each use, remove wood chips and dust. A small brush can help reach tight spots. This simple step enhances performance for future tasks.
Another important aspect is proper sharpening. Over time, bits dull, leading to poor results. You can sharpen by hand or use a specialized tool. Be cautious not to overdo it; too much sharpening can ruin the bit. Always test on scrap material before proceeding with important work.
Finally, store your countersink bit safely. A protective case can prevent damage. Avoid tossing it into a toolbox with other tools. When stored incorrectly, bits can become nicked or dull. Reflect on your habits; often, we overlook these details. Developing a routine can extend the life of your tools significantly.